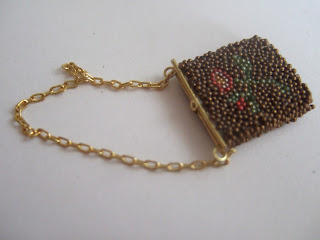
I was able to get to the craft store last weekend, and picked up a few more colors of micro beads. As I was playing around with them, I thought you might like to see how I made the beaded handbags.
Tools:
Scissors
Wire Cutters
Needle Nose pliers
Pencil
Toothpicks for spreading glue
A piece of uncooked spaghetti for picking up the micro beads.
Supplies:
thin cardboard
a pattern for your handbag
Tacky glue
Mod Podge (I use matte finish)
Micro beads in at least two or three colors.
gold paint (a paint pen works!)
black paint (only if you are using dark micro beads)
brass headpins
gold wire
fine gold chain
brass finding for the clasp (I cut mine down from a larger piece of filigree)
1 tiny crystal in a color that coordinates with your micro beads
I traced a plastic template to get my handbag shape. I make them about 1/2" wide. You will want your cardboard to be about 1/16" thick, so you may have to stack several pieces together if you use thinner cardboard.
It takes me three pieces of cardboard to get the correct thickness. I trimmed the edges flush where the pieces didn't quite match up. I also painted the top of the handbag (where shoulder chain and clasp will go) gold.
Begin drawing out your design... If you are planning to use black or other dark coloured beads, you should paint your cardboard with a thin black wash before drawing out your design. Otherwise, the grey cardboard will show through the finished beading!
Use a toothpick to cover one portion of the design with glue.It's important to be precise here!
I use a piece of uncooked spaghetti, dipped in water, to pick up the beads.
The beads tend to pile on top of each other.
I use my finger to pat the beads flat against the cardboard. Sometimes, I need to use the spagetti to move them around a bit as well.
Allow the glue to set for a few minutes before you move on to the next section. You may be tempted to just dip the cardboard into the micro beads. The problem with dipping into the beads is that it leaves big (relatively speaking) gaps between some of the beads, and you really want them to be as tightly packed as possible. Trying to fill those gaps usually ended up taking me longer than the spaghetti method.
When you've finished the entire front side, stop and let the glue dry really well. You may notice that some of the beads have come off the edges as you worked. This is a good time to touch them up.
When the tacky glue is completely dry, take a little mod podge and gently pat it over the beads using your finger. I like to use the matte finish because I think the way that it tones down the beads' shine makes the bags a little more realistic.
If you click the photo below, you can see how the mod podge mostly pools around the sides of the beads, leaving the top of each bead clear. Whether you use gloss or matte, this step is essential-otherwise the beads will flake off!
After the mod podge has dried, flip the bag over and cover the back with beads using the same process. Finally, cover the bottom and sides of the bag with beads.
Now it's time for the hardware!
Find brass pins or thick wire for the frame.
Cut to pieces of brass pins/ thick wire the width of your bag.
Glue one piece to the top , as far back on the cardboard as you can. Set the second piece of wire aside for now.
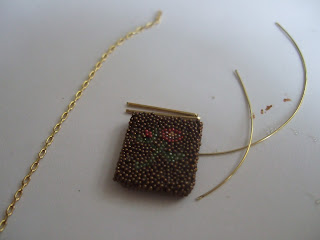
Cut two pieces of thinner wire, and a small section of fine gold chain.
Thread one end of chain on to one of the thin wires...
And use needle nose pliers to bend a tight loop.
Do the same with the other end of the chain, and then cut the wires to a little less than 1/4".
Glue the two pieces to the handbag, in front of the thick wire you glued on before. Make sure that the wire loops stand straight up. I like to add a little super glue at this point, to make sure all the wires stay in place.
Glue the last wire in front of the looped wires.
See the three layers of wire? The gap in the center will get covered by the clasp.
Cut a tiny piece out of some brass filigree, bend it into a slight point...
And glue it to the center of the frame! Definitely use super glue for this part!
I like to add a tiny crystal to the clasp.
That's it! If you make this project, I'd love to see photos! If you run into difficulty please don't hesitate to ask!
To see more beaded handbags, visit
this post.


.jpg)


.jpg)


.JPG)


+(2).jpg)


