Tuesday, September 16, 2014

Lots of Catching Up

A lot has happened in the last two months, and this blog post is long overdue.  The most exciting thing to happen on the miniatures front was this:
Anne Smith's article about Mom and I appeared in the September issue of Miniature Collector!  We met Anne at the Philadelphia show last November. She tracked us down after the show and proposed the article.
The title of the article, "Two is Company and More," is a play on our business name, Two's Company Miniatures.  


The other big event was Mom's graduation. For the past three summers, she's been in an intense master's program to become a principal/school administrator.  This was my graduation gift to her. 
I used a man's slipper pattern kit (designed by Bobbie Schoonmaker) to get the basic slipper shape. Since Mom already had a finished pair of the kit slippers, she asked me to make a pair with foxes instead.  I charted the fox heads, then added hounds to the side.  Since I had Mom approve the design and colors, the slippers weren't really a surprise, but I did manage to surprise her that they were finished!

Last of all, I've started a new project. It's an offshoot of my little french shop project.  I'm trying to create a very different feel despite using similar techniques.

I'll post more about this project next time: this is just a sneak peek!

Saturday, July 12, 2014

A New Roombox... in 1/144th Scale!

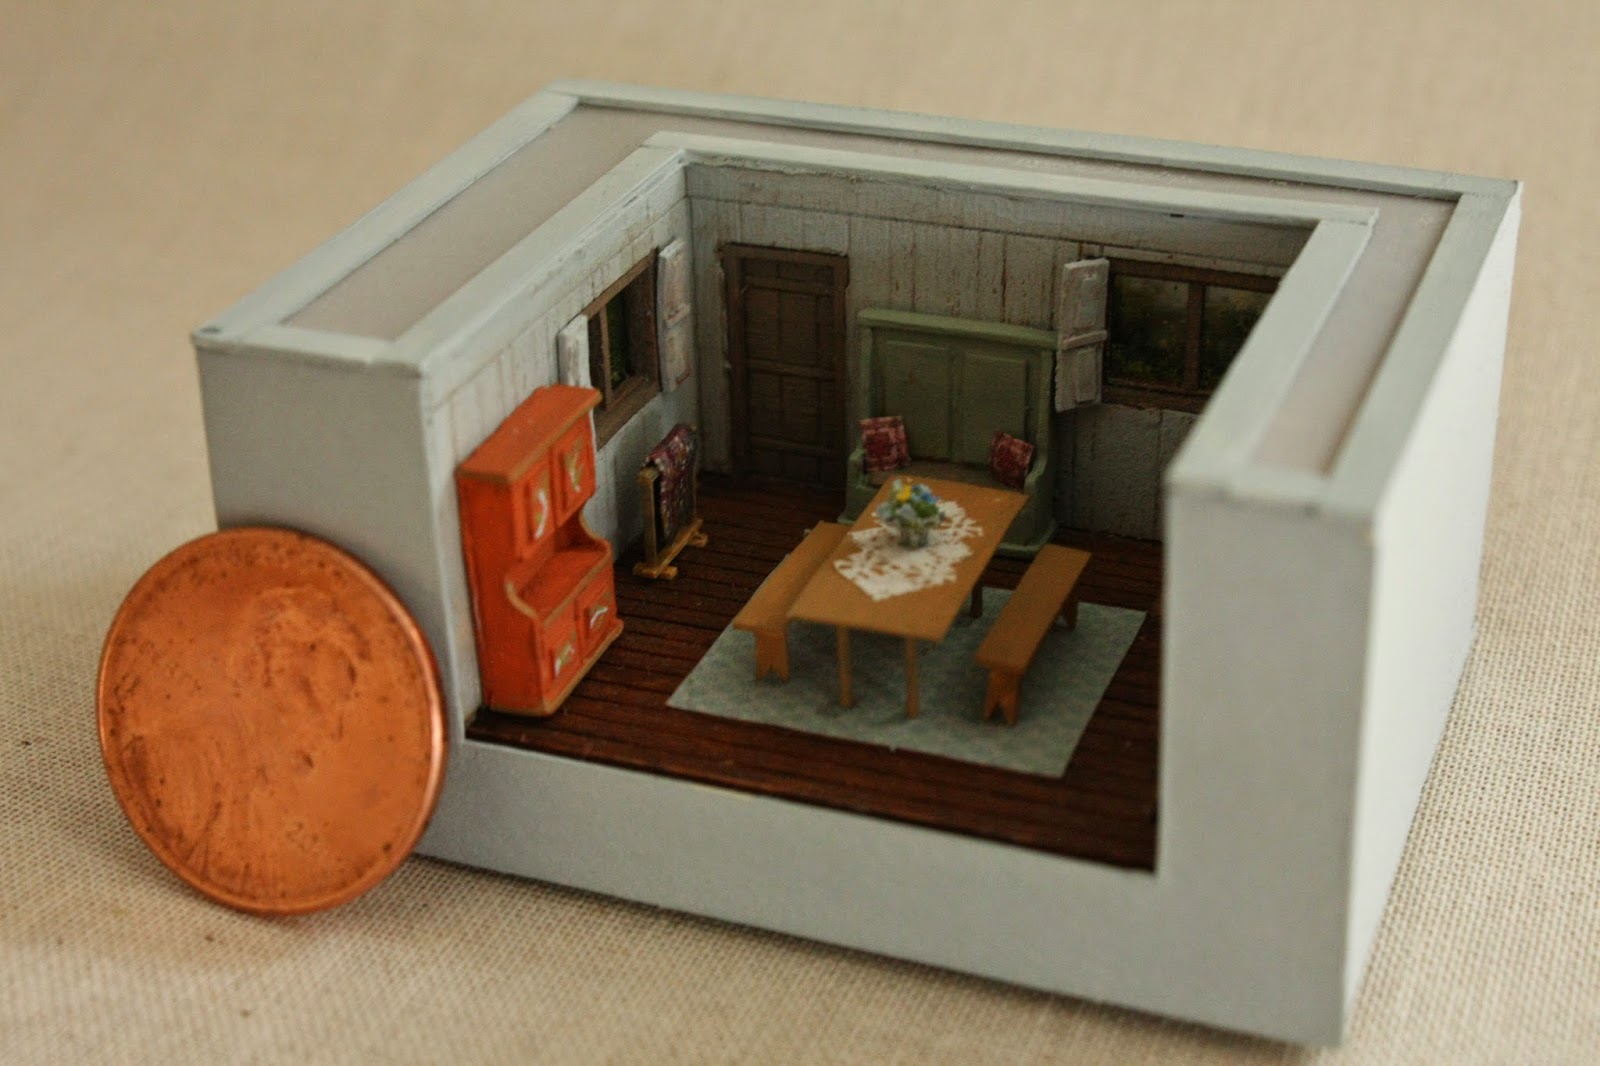
 About five years ago, I came across these fantastic 1/144th scale kits from Davis Wooten.  They produced only two of these room box kits - the Pilgrim Kitchen (shown in this post), and a more formal paneled room called the Salem Dining room. I loved these kits so much that I bought several of each design. Unfortunately, I had a bit of warping trouble with the first one I attempted to put together, which put me off from working on the kits. While straightening up the other day, I found the kits again. 
 This is  the room box that had the warping issues. I now stick the pieces flat to my worktable with extra strong double sided tape, and weight them down as the paint dries.  I think these room boxes are some of the best laser cut kits I've seen. The design of the kit is a bit unusual: the walls and floors are made of two thinner pieces  of wood which need to be glued together, so that the wood grain is vertical inside the box and horizontal outside. In addition to making the box stronger, the double-wall construction creates realistic depth for the window and door recesses, and makes it really easy to paint! The only issue I had was with the fireplace, which showed a few gaps no matter what I did.  Every other piece fit like a glove.
This second time around, I decided to paint the walls a soft grey-blue. I furnished the room box from a combination of sources. The brick red cupboard and green settle were both cast resin pieces from Nell Corkin, and the benches are similar to one she had us build at the Guild School. The basket of firewood and ax were both model railroad pieces. I built the table, quilt stand (under the left window), and shutters from scratch.

Light was a major consideration for this roombox. The kit comes with a beamed ceiling, which looked great but made the room very difficult to see.   I considered using the ceiling, and adding lights to the fireplace and "outdoors" to brighten the room. I thought about adding the beams without the ceiling, or replacing the solid white ceiling with a piece of clear glass. In the end I decided that the beams just weren't going to work for this room box.
I also decided to set the kitchen room box in a larger case, so that I could have a view out the windows. I used a bit of vellum paper for the top of the box.  The frosted finish hides the "outdoors" but lets plenty of light in. 


I added lots of little details to this room. The windows have real glass, courtesy of a microscope cover slip. I even added a few painted flourishes to the red cupboard. I'm particularly pleased at how realistic the  bowl of "wildflowers" look. I  used floral foam for those, broken into tiny, tiny pieces. The finished arrangement is only 1/32" tall. 
I still have a few finishing details to fiddle with, but the room is nearly done. I'm already eyeing the other kits, so stay tuned!

Saturday, June 28, 2014

Updates to the Parlor


A while ago, I went through the parlor and did some serious re-arranging.  Despite having quite definite ideas of the way I wanted this room to feel, I've always struggled with this room. Compared to the real-life rooms I've been inspired by, my miniature parlor is somewhat small and quite narrow, with tiny windows, while the off-centered fireplace makes many furniture arrangements look unbalanced. The mint green chair will not be staying that color, and may not be staying at all. I'd really love an overstuffed green velvet chair there instead, but I don't think there's quite enough room for the style I have in mind.
 
My next big project in this room will be the curtains. I've been saving a photo of the ones I want for at least a decade- the only problem is finding a similar looking brocade in miniature! I plan to make the curtains somewhat larger than the window, in order to cover up as little of the glass as possible.

There's a bay window nook on the door of the house. This space has changed frequently over the years. As I began to think about how I would curtain this space, I realized that the space is really far too small for both curtains and any of the furniture I'd filled it with in the past.  Instead, I plan to build an elaborate terrarium.  The small terrarium in the photo above was a trial, to get a feel for the construction process. I built the frame from styrene (plastic) rods, ornamented with more plastic pieces. The "glass" is clear plastic, coated with glass paints.

I also made a few additions to the room itself. The smaller, off-white pillow on the sofa is my first finished piece of miniature petite point! I used a free pattern from Open House Miniatures, and worked it on 45 count linen.  To be honest, I wasn't planning to make a pillow, particularly not on the bulky linen. I just wanted to whether petite point was possible on the linen, and it somehow grew into stitching the whole pillow! I've since started a new project on silk  gauze and find it so much easier!
  The table is (I think) made of resin, by John Hodgeson. Mom made the fern years ago for my music room. The figurine is made by Goebel, as is the chair (one of a pair.) The Goebel chairs had the most awful seats, covered in  acid yellow flocking. I used a vintage silk tie to reupholster them.
Next to the fireplace, I've added my beloved little writing cabinet, painted by Rosemarie Torre. At the moment, it's sitting on a silly little table I made. You can  also see the finished bamboo overdoor at the top right.
I have this gorgeous little cloisonné vase up there now, and am looking for a suitable plate to go behind it.


Last but not least, I had a little fun with the photo editor, and made an "old" photograph of the room. That bare window sticks out like a sore thumb, but otherwise I think it's looking pretty realistic!

Saturday, May 31, 2014

At the Sturbridge Show

Mom and I are at the Sturbridge show right now! The preview is over,  and tomorrow is for the general public.  Hopefully the room won't be as cold as it was tonight!  I'll post start posting again more regularly when we get back from the show. In the meantime, here are a few photos of our table, taken during setup. 


Monday, April 7, 2014

A Stitch in Time...

 Inspired by her favorite miniature samplers made by Caren Garfen, Mom recently picked up some linen at the fabric shop. Though there were a couple different options, the one Mom eventually purchased had a nice even weave. Unfortunately, it only came in a bright white that has been surprisingly resistant to coffee "ageing.". While Mom was working on a more elaborate sampler, I snagged a bit of fabric to make a simple band sampler.
True to form, I just started stitching without a plan. The rows went quickly, since the patterns were simple and repetitive. Some rows were all half cross stitch, but for most I used a combination of stitches.

Above, you  can see the little sampler I did on the left. It has 45 stitches per inch.The "Charity" sampler is needlepoint, from this etsy shop, which Mom gave me for Christmas last year. The bottom sampler is by Caren Garfen, and has the tiniest stitches of the three.
I only really charted the last row.Mom requested I add the date of her cottage, and my initials. The rest of the designs were doodles in case I ran out of ideas!

Thursday, February 20, 2014

Details... The Little Shop part 5

 I've not had a lot of time recently to work on the shop, but I've managed to squeeze in a few little projects. The shop is really starting to look realistic, especially considering it's mostly made of foam core covered in cardboard!

I've added a couple dandelions out front.  I hand cut the leaves and calyx from painted coffee filter paper. The yellow flowers are simply mounds of glue covered in flocking. For the dandelions gone to seed, I used a clear bead covered in a fine layer of white flocking.

I made a second dandelion half hidden behind the boot scraper.  This one had a bit of wanderlust. I'd actually glued the plant down in another spot, and had to "dig" it back up when I realized it was nearly in the walkway.
I was considering adding some litter to the sidewalk. I went so far as to make cigarette butts, but I ultimately decided against them. I went to college with a lot of smokers, though I'm not one myself. This tattered old flyer is the only bit of litter that made it onto the shop.

I did add a few more washes of "dirt" to the sidewalk. I was pretty pleased with the sidewalk stones, but they were starting to look too clean and new amidst the rest of the scene.

I also finished the iron fence on the left side of the scene. I had a bit of a happy accident with the fence.  The iron paint dripped and formed rust stains on the stones. 


Last of all, did you spot the new addition to the rose bush? This little nest was an experiment that turned out even better than I'd hoped! Most of the miniature nests I've seen looked really fake.  A few weeks ago, I cut a handful of dead winter grass and spread it out over the radiator. Once it had dried out really well, I crumbled it up, and mixed in a drop of tacky glue. The grass and glue mixture formed a quick-drying clay, which was easily sculpted into a nest.

Monday, February 10, 2014

My French Shop Project, Part Four

Mom and I did get the chance to go to the dollhouse shop over last weekend. Unfortunately, they were all sold out of the iron railing I  needed. Luckily, the shop assistant remembered that they'd recently used the same railings on a customer's dollhouse. She scrounged around in the scrap bin, and managed to find quite a few good-sized lengths of railing for me. After patching the pieces together, I had more than enough for my shop.
I only used the top half of the fencing for the shop roof. I first sprayed the railings with flat black paint, to prime them. Then, I used the special iron  paint, which comes with a rusting solution to create a realistic iron finish. Unfortunately, I think the paint is getting old, since I couldn't get much rust to form. After reapplying the solution several times with little effect, I finally resorted to my watercolor pencils.


The iron fencing to the side of the door still needs to be painted. This was one of the trickiest parts of the whole project. Since the shop is front-opening, I needed to make the railing removable. I forgot to take a photo of it, but the fence is held in place with straight pins inserted into holes in the base.
I also managed to find a piece of plastic large enough to cover the window.  The "lead" munions are made of thin strips of plastic, which I painted black, then drybrushed with silver paint. Now that the window is in place, I'll probably adjust the shelf spacing.

I glued one of the pigeons over the door. Normally, I prefer to use sticky wax rather than glue to hold this type of thing in place, but I didn't want to chance it falling off.  


I'm still adding leaves to the rose bush. It's starting to look nice and full, but it still has a way to go.  Since adding the fencing to the roof, I'm rethinking my plans to cover it with climbing roses. I was worried that the plain iron would be too stark, but seeing it together I don't think it needs the vines. I'd still love to add some rose vines eventually, but I'm in no hurry.


The shop is getting close to being finished, but I'm really milking the finishing details.  The big elements are pretty much all in place, but I still have lots of ideas for little details, from buttercups to butterflies.
You can see the shop's progress in parts one, two, and three.