Tuesday, January 31, 2012

Two New Watercolors

... or rather, one new watercolor, and an old one which I just got around to framing. 
 This city street is the newer painting. I tried something new for the frame, first painting it white and then brushing it with gold Rub'n'buff. Unless the frame is in sunlight, the metallic is very difficult to see. Otherwise, it really looks more like an aged, grey-brown finish. I liked the effect for this painting, but don't think I'll use this finish very often.
This portrait is one that I did about a year ago. Unfortunately, I used the wrong type of tape around the edges, and the background bled terribly. I stuck it in a box with a few other problematic paintings, and promptly forgot about it! When I I found it again, I really liked the dark frame, but the bleeding showed, and there was no space for a mat which might have covered it up. I had to use a bit of paint to salvage that white border, but I'm very happy with the way it finally turned out!

Sunday, January 29, 2012

Miniature Laquered Boxes

 I've always liked Russian lacquered boxes. I thought I'd try to make some in miniature. A circular box about 1 cm in diameter seemed a good size to start with.  The box on the right was my first attempt.  I had lots of trouble with this one. You can see that the finish isn't quite even, and I thought that it was a bit too tall. I tried to copy a Russian box which my mother owns for the picture on top. The painting on the first one also came out a bit dark. The traditional way to paint these is to gild the silhouette of the scene/figure first, and then paint over the top in thin layers. Since I was only trying to make these boxes look like their larger pieces, I just used a base coat of white paint to brighten the figure on the second box.
 I like the boxes best open. I'm going to have to try a few more of these. The basic box was easy enough to make from card stock, but I'm not happy with the simplicity of my paintings. I may try decoupage for the next set!

Friday, January 27, 2012

A Tiny Secret

 By now you probably know that I like to make miniature books. This one is the latest. But it has a secret...
This little reading nook is inside! Looking at it again, I think I want to put a cushion on the chair, and a book on the table. Maybe a pair of sconces on the wall?

Tuesday, January 24, 2012

A Before and After

 I spotted this chair at my local dollhouse shop the other day. It was a bit chunky, but I liked the front legs, and the price was low, so I bought it.
This is the way it looks now:
You might have noticed I did a little surgery on the chair. The braces on the bottom were too chunky, so I broke them off and sanded that area smooth. I also used an X-acto knife to hack off portions of the back legs and bevel the slatted backs.
 It might not look it from these photos, but the back legs of the finished chair have only about half the wood they started with!
Carving down the chunky bits of commerical furniture is an easy way to make these pieces look a little less mass produced!

Friday, January 20, 2012

Dolls for Dolls!

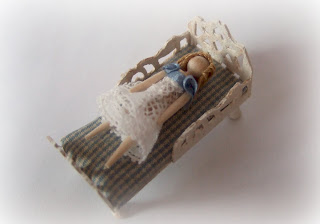
I am a bit addicted to miniature toys. Dolls, bears, and toy theaters are my biggest vices, but I'm drawn to almost any tiny toy! It's gotten to the point where I have far too many toys to display in my dollhouse. So it really made no sense for me to make even more...
These little wooden dolls are less than an inch tall. I stole fabric and lace from Mom's supplies. The basket that the doll above is carrying was made with thread (there used to be a tutorial on the Yahoo MicroMini group, but I'm not sure if it's still there.) She still needs a big straw picture hat, which I think I can make with more coiled thread. The doll bed below was an experiment using pieces of a sandlewood fan. The bed is a bit fragile, so I don't recomend using fan fretwork in this way!

Wednesday, January 18, 2012

A Ladylike Accessory

 I have a small collection of vintage handbags which I frequently use. It struck me a while ago that I could try making them in miniature. After a bit of fiddling around, I came up with this:
 I used very thin imitation leather for the handbag. I used a brass pin, some fine chain (for the handle), and a scrap of a brass finding for the hardware. I had a terrible time getting the chain to stick.

 After the terrible time I had with the chain, I decided to try a clutch type handbag next. The fancy clasp on this one is made from a cheap ring (from the craft store 'wedding' aisle)
 And just for a laugh, here was my first attempt at a handbag a few months ago. I used silk-covered card and metallic tape for the clasp. The silk was a horrible choice: it frayed horribly, and got glue spots which I tried to hide with gold beads.
I never showed it because there were so many problems with it, but it's been sitting on my table for months as I worked out better ways to make a handbag. I often like to keep "failed projects" like the green bag below until I've worked out a successful version. I think seeing everything that went wrong in previous versions can help me figure out a new approach. At the very least, it (usually) stops me from making the same mistakes over again!


Monday, January 16, 2012

New painting

Just popping in for a moment to share this miniature watercolor. Framed, it's about an inch and a half tall.
Sorry to be so quick!

Saturday, January 14, 2012

Giveaway winner!

And the winner is...
 Cristina! Please contact me asap with your address so I can send you your box of miniatures. Everyone else, thank you for entering, and I hope you win next time!

Wednesday, January 11, 2012

A Case for Fans and Giveaway Reminder

 A while back, I posted about the hand-painted silk fans I had just made. Well, the other day I made another, but this time I also made a case for it! I chose a warm brown silk for this fan, in a heavier weight than the silk I used last time. The silk I used last time was meant for lining clothing, and it seemed to get glue spots every time I looked at it!
 The case has a pale green interior and gold (brighter than the photo below shows) exterior with a pale green painted detail around the edge. The "aged" glass which I used made the fan a little difficult to photograph. 
 I made this particular piece with the idea that I might hang it in my parlor, so I kept the colors close to the ones in that room, without trying to match them exactly.
P.S. Don't forget to enter the giveaway before Saturday!

Saturday, January 7, 2012

Giveaway!

EDIT: COMMENTS NOW CLOSED. WINNER WILL BE ANNOUNCED LATER TODAY.


TO ENTER THE GIVEAWAY:

1)If you are not already a follower, please join before you enter the giveaway. The button is in the right hand column, near the top of the page.

2) Leave a comment on this post. In the comment, list the three books titles you'd like to receive if you win. I'll choose the winner next Saturday.

The winner will receive:

Six 'old' letters, three postcards, and a telegram with envelope...
A whole bunch of bills and receipts (debt not included)...
a mouse...
a perfume bottle...
a set of paper dolls already cut out (Nanny is about 1" tall)...

and any THREE of the readable books shown below.

Fairy Tales and Nursery Rhymes:


 The Arabian Nights
The Buckle My Shoe Picture Book (this book is extra small!)( published 1910)

Classic Stories about Girls:
A Little Princess by Frances Hodgson Burnett, author of The Secret Garden (published 1905)
An Old Fashioned Girl by Louisa May Alcott, author of Little Women (published 1869)
The Governess by Sarah Fielding, (sorry, I forgot to photograph this, I'll add a photo tomorrow) (published 1749)
Heidi by Johanna Spyri (published 1880)
Stories about knights and adventure:
Ivanhoe by Sir Walter Scott (published 1820)
King Arthur

The Merry Adventures of Robin Hood by Howard Pyle (1883)

Children's Magical Adventure Stories:
Peter Pan by J. M. Barrie (1902)
The Water Babies by Charles Kingsley (1863)
Alice's Adventures in Wonderland by Lewis Carroll (1865)
Gothic Novels:
The Castle of Otranto by Horace Walpole (1764)
The Monk by Mathew Lewis (1796)
Nonfiction:

Letters from the Earl of Chesterfield (letters written to his son, and published in the late 1700s as a sort of early guide to manhood)
Line and Form (an art instruction book by illustrator Walter Crane, published 1900)


GOOD LUCK!

EDIT: COMMENTS NOW CLOSED. WINNER WILL BE ANNOUNCED LATER TODAY.


Thursday, January 5, 2012

A New Scrap Screen

Over Christmas, I received a few wooden dollhouse screens to make more scrap screens. It's been a long time since I last posted about these. You can see the last screens I made here and here. I always cut all of the pictures (the 'scrap') by hand before I start a new screen. It usually takes about a week of intensive cutting to get enough images, but since I had a lot already prepared, I got to go straight to gluing this time.

I still have a bit more to do on the bottom left panels, and then I'll go back in and add the tiniest images to fill any gaps.

Sunday, January 1, 2012

The First Miniature I Made, a Painted Shelf, and Crockery

 Happy New Year! I thought I'd share one of the very first miniatures I ever made today. This was a tissue box I made when I was about seven. It's made out of flat plastic beads which I glued together with a glue stick, since that was the only type of glue I had.
 These are my latest projects. I found the wooden shelf at Eileen Godfrey's, and am in the process of painting it. The crockery bowls are made from rolled paper. They won't be on this shelf permanently, but I had fun arranging them like this while they were all out on my worktable.