Thursday, January 30, 2014

A Canopy for the Nursery

I haven't had a chance to work on the shop for a while.  If all goes well, Mom and I will be making a trip to our local-ish dollhouse shop this weekend, where I'm hoping to find the iron railing. In the mean time, I thought I'd share a project I worked on a few months ago. I've had this Bespaq crib for years in an undressed state. I finally decided it was time to do something about its bare canopy.
 The nursery is a long, dark room at the back of my house. It was originally meant to be the bathroom.  My uncle, who built my dollhouse, covered the walls with plastic tile. I guess he really wanted it to stand up to a lot of play, since we literally had to melt the plastic off when the house was refurbished. 
I raided Mom's doll-making supplies for sheer white batiste for the canopy top, and found some vintage embroidered pieces in my own stash to make the curtains. I still need to make a frill to go around the wooden canopy top. 

There's barely room for the nursemaid! I love how kind she looks. For more details about the nursery, you can read about the curtains here, the bookcase here, and the cheap metal spoon I reworked here.


Tuesday, January 21, 2014

More Progress: the Shop Part Three

I've made a few more additions to the shop, though it is still very much in progress. The closer I get to finishing, the longer each step seems to take.
The first thing I did was to finish the sides of the shop with bricks. The last time I posted, I was planning to make the bricks from sandpaper. However, it took me a while to get to the hardware store, and in the mean time I discovered a bit of leftover paper clay in my supplies. Unlike my disastrous first attempt using damp paper clay, this time I rolled out the clay and let it dry to a leathery stiffness before I cut and glued the individual bricks on. This stopped the foam core from warping.  I just cut the bricks by eye, without bothering to measure.
My next step was to add a copper gutter along the side of the shop. The gutter is made of card stock, and the downspout is a drinking straw. I was worried that my copper paint wouldn't stick to the plastic straw, so I coated it with a few heavy coats of primer first. 
 Mom has said a couple times that her favorite part of the project is the little weed growing between the pavement cracks. Once the brick work was done, I wanted to add more weedy grass along the side of  the building. Since I'm trying to do this project using only materials I already own, I had to get creative.  I happened to have a few scraps of fur in my supplies. I cut a narrow strip of fur and painted it green. The paint made the fibers clump together, so I gently combed it out before the paint dried.


I found another little Clive Brooker flower pot in Mom's extra miniatures and couldn't resist using it. The leaves of the plant were made from a coffee filter, and it's "planted" in a removable piece of Styrofoam. I'm not sure how well the coffee filter will hold up over time, so I didn't want to plant it permanently. I don't have a piece of glass (plastic) big enough for the window in my supplies, so I'm stalking the recycling in hopes of finding something.

 These pigeons began as little plastic figurines. I cut off their big bases and repainted them. I've used these plastic pigeons for several different projects. The factory painting is pretty awful, but the birds themselves are nice and delicate.

Last of all, here's a peak at what I'll (maybe) be working on next. I'm toying with the idea of adding an iron railing to the top of building, and covering it with dozens of pale pink roses. These aren't the railing or the roses I'd use, just pieces I had that gave the general effect. If I do add the railing, I'll use a shorter one made of plastic, and smaller, more delicate roses. Two considerations are holding me back. One is that all those roses would be a ton of work, and I really dislike making paper flowers. I can force myself to make them, especially since I love the finished product, but I can't stand the process. The second consideration is that all those roses might distract from the window display. Which way would  you go?Would you add a railing and roses or not?


Tuesday, January 7, 2014

My New Little Shop Project, Part 2

At first glance, it probably doesn’t look like I’ve made much progress on my little shop since the last time I posted about. But in reality, I’ve had to redo almost everything. The only thing that was perfectly fine was the front wall of the shop. Fortunately, that front wall was the only piece I'd put a lot of time into. In the last post, I mentioned that the structure was warping. Since the back and sides weren't going to be very visible, I figured I'd just slap a layer of paperclay bricks over the whole thing and call it a day. I didn't think about what a effect the damp clay would have on foamcore...

 Here's a photo of the paperclay bricks that caused the warping. I used a textured sheet of plastic (sold as a fondant mold for cake decorating) to make the brick pattern. This is one of the quickest ways I know to get miniature bricks.Though the grout lines are far too big, the bricks themselves are pretty close to 1/12th scale, and can look pretty good in certain situations.  I use a crumpled piece of tin foil to texture the bricks. 

The warping turned out to be a blessing in disguise. The paperclay was a quick solution so I could get on with the fun part, but it didn't look as realistic as I'd wanted. I like this second version of the stones so much better!

The second time around, I decided to go with a technique I'd never tried before: egg carton stones. 

So much more realistic! In the photo above, you can see the new sidewalk made of cardboard egg cartons on top, and the old paper clay sidewalk below. I used another fondant mold that was supposed to look like cobblestones, which was a definite mistake. Aside from the whole warping issue, the mold just wasn't deep enough to make realistic stones.


 Here's a closeup of the new egg carton stones. I followed Casey's tutorials here, then added a little model railroad dirt between the cracks. I still have to do the sides and back walls (using sandpaper bricks for a change of texture) but I couldn't resist making a tiny weed.


 I've been hording a few Clive Brooker  mossy pots for years, but I may use one on this project. I've already filled it with dirt, (painted styrofoam) but have yet to plant it. I have quite a few irises left over from the music room, which might work, but I'm holding off until the big decisions are all made.


Another big change I made was shifting the shop over on the base. In the first version, (above) the shop was centered, with an awkward little strip of sidewalk on each side. But while playing around with various props, it became clear that there just wasn't enough space for all the things I wanted outside my shop. Moving the shop to the left side of the base gave me a lot more room to play without making the overall size any larger.
I made a few (relatively insignificant) mistakes in putting together version two of the shop. The first was that I mis-measured the depth of the shop, resulting in a narrow gap between the stones of the sidewalk and the shop. I could have easily filled this in with a few more stones, but decided it would be easier and more interesting to fill the space with dirt and weeds.

 The second mistake was painting the interior of the shop the wrong color. I was sure I'd painted the inside using Folk Art's baby blue (on the right above). Instead, it seems I'd used their Dove Grey (left).


The Baby Blue turned eye-searing when it was covering the full wall.  I've never repainted anything so quickly in my life!


 Getting to this point was exciting, since it meant I could take a break from the big, structural stuff to work on some fun details.
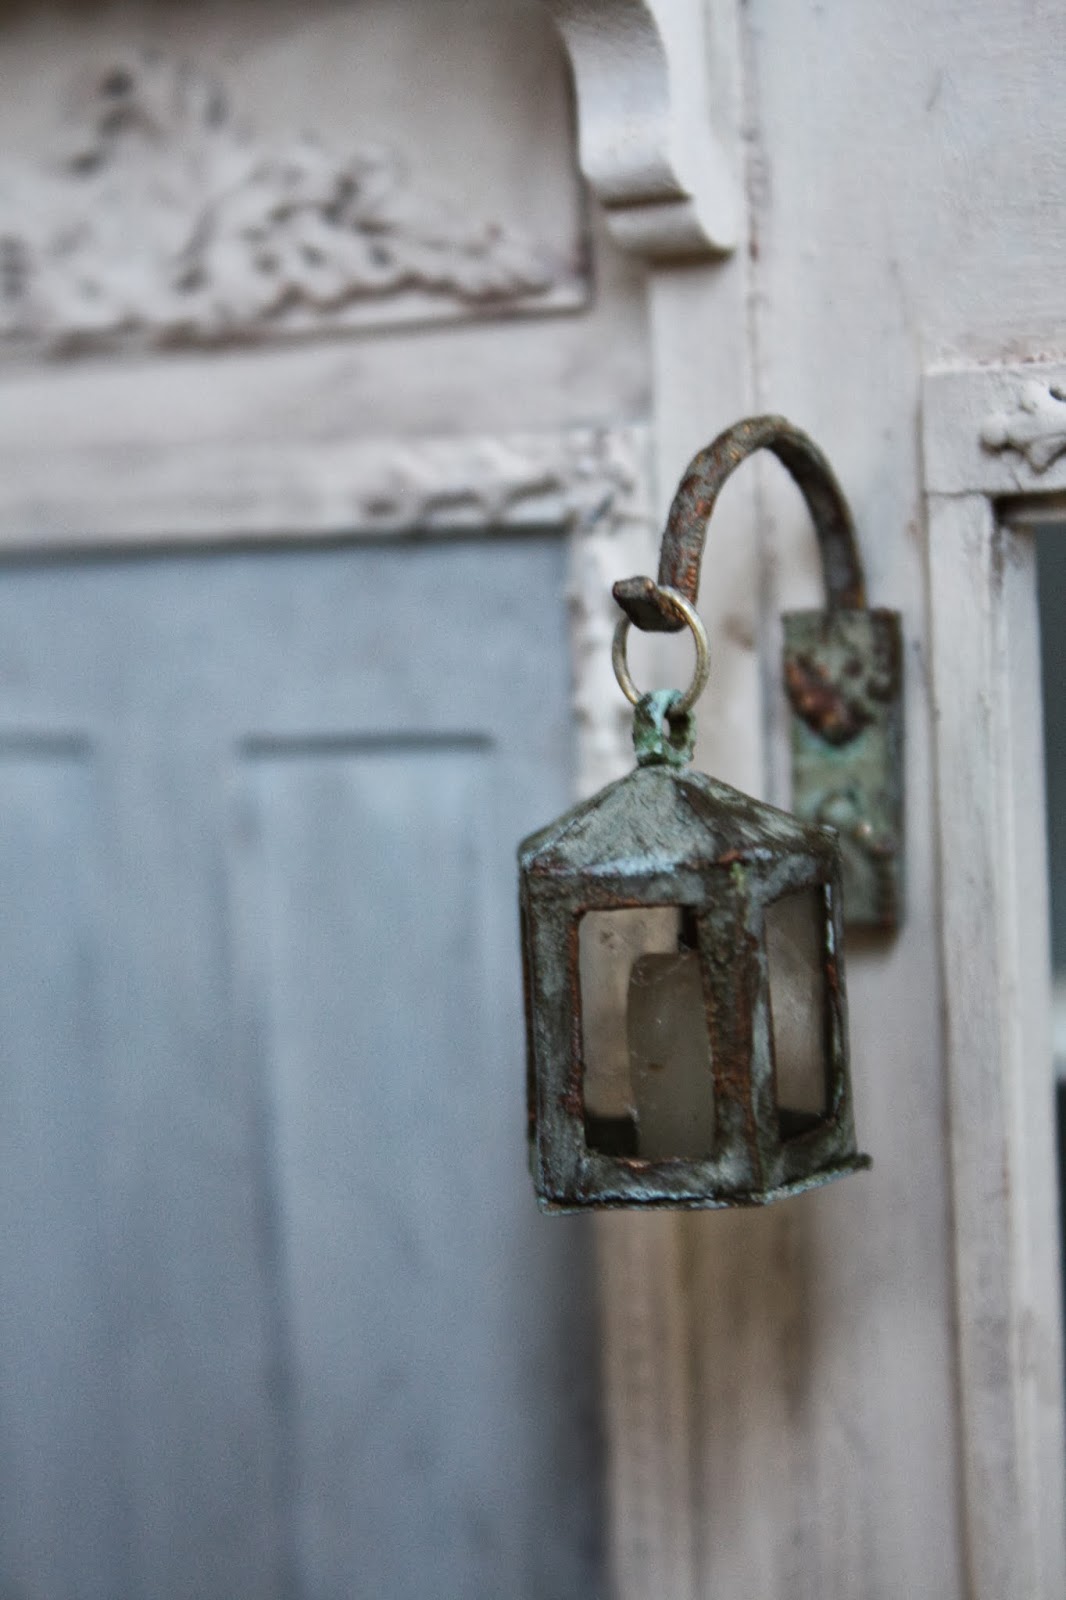
I made the lantern out of card stock painted with the special oxidizing copper paint I wrote about here. I made it five-sided, just to make it a bit more interesting. The "old glass" is mica. I bought some on eBay two years ago and have used up almost all of it on lanterns and similar projects. The hook for the lantern is just a cheap metal wedding ring (the same type as I used to make this umbrella stand,) with a back plate of card stock, scrap wood, and jewelry findings.
 
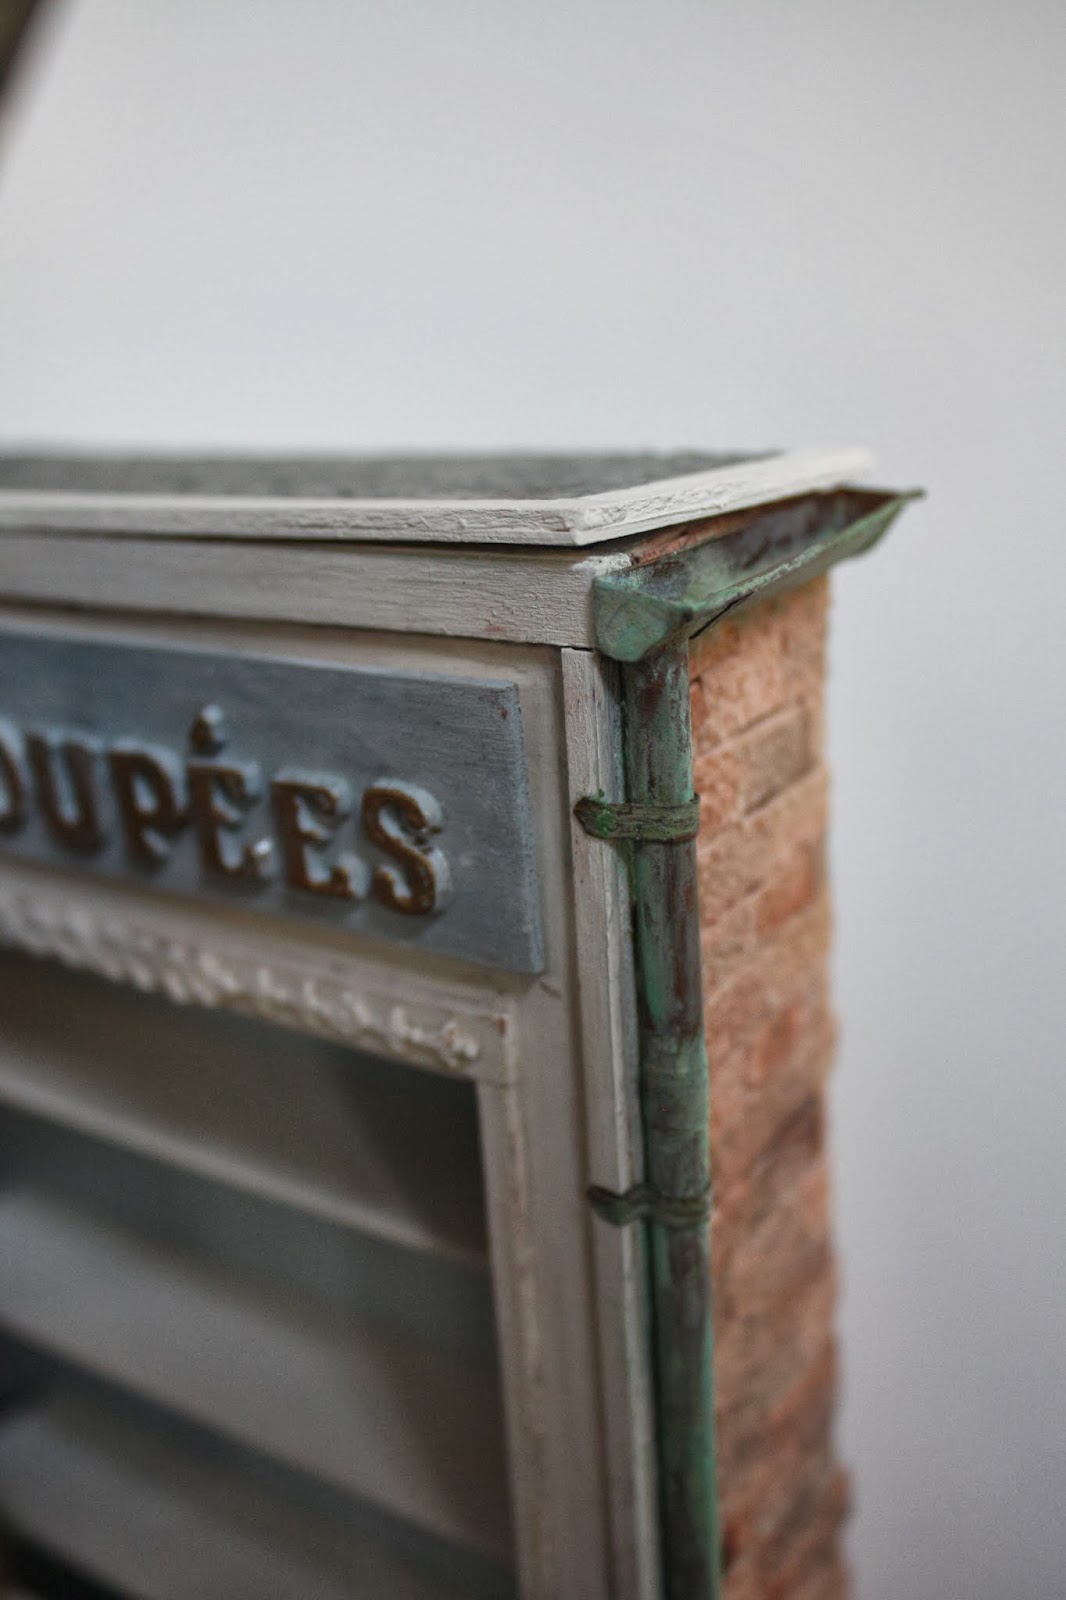
 I liked the copper lantern so much that I decided to make a copper awning over my door. The top is a piece of strip wood, covered in card stock to hide the wood grain. The scallops hanging down were Mom's idea.
 Here's a picture of the top. You can really see all the various colors of the oxidized copper here.
 One more picture of the entrance.


I added a boot scraper near the door. It's made of card stock and fancy toothpicks, painted with another faux finish paint set to look like iron. For some reason I had a really hard time getting the rusting solution to work, though it's worked perfectly when I've used the paint before.
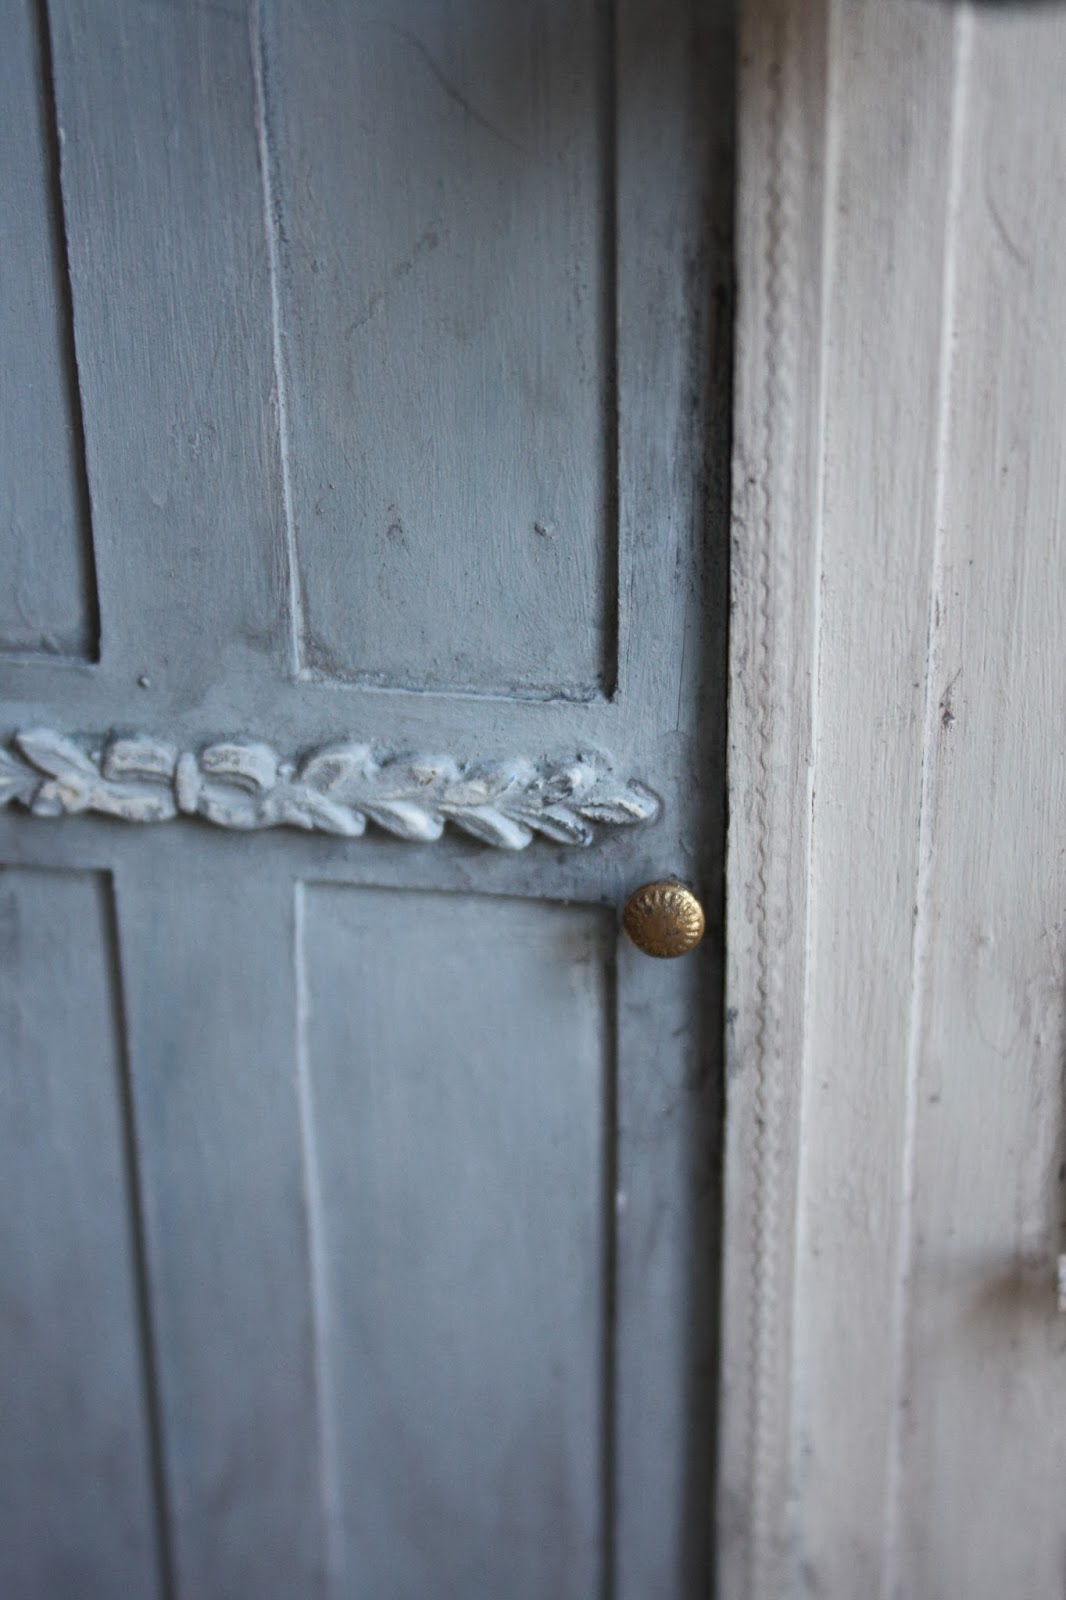
I added a bit more dirt to the door itself, especially around the handle and the bottom of the door. I'm trying to find a good balance between realistically old and worn,but not neglected. The watercolor pencils I'm using are great, because they can easily be washed off if a section gets too dark.


 Here's a side view showing just how shallow the shop is.  I'm completely out of narrow strip wood, so I haven't been able to cover the white foam yet, and then all the brickwork needs to be done.
 The shop also still needs its roof, and a piece of glass for the front window.
 The sign is just temporary and is held in place with a bit of sticky wax. I'm planning to paint a more elaborate one eventually. In fact, I'm thinking about making several signs for the shop, so that I can rotate a few different collections through the window display. I'm not quite sure whether this idea  counts as restraint restraint  or indulgence.
The front of the shop will remain a removable panel so that I can change the window displays. 

 This sophisticated system of strip wood holds the front in place :-) The slight flexibility is actually an advantage here, because it makes it very easy to get the front in and out.
Hope you've enjoyed seeing how this little project is coming along!


Thursday, January 2, 2014

Dresden Ballerinas and a New Camera


I've been taking photos with the same little point-and-shoot since beginning this blog. Unfortunately, that camera is now a bit outdated, and it has been steadily getting more complicated to upload the photos. Recently, it's become almost impossible to use.  I'd been waffling on whether to upgrade to a better camera anyways, so it's definitely time to retire my old camera. I know almost nothing about photography, but my brother offered to loan me his camera so I can learn a bit before I purchase. If any of you have recommendations for cameras, photography tutorials, etc. I'd love for you to pass them along.
This old photo shows the "Dresden dancer" made by Goebel. She's made of cast bronze and is beautifully detailed, but she's never quite looked like the ballerinas I love. It's also always bothered me that her skirt doesn't look appropriately lacy. Real Dresden figurines (especially ballerinas) often have porcelain lace details, made by dipping real lace in liquid porcelain. When the porcelain is fired, the lace burns off, leaving the porcelain behind.  In the background, you can see my real life Dresden ballerina lamp. Her skirt is entirely covered in porcelain lace, though unfortunately it's quite damaged.

These are my two attempts at making Dresden ballerinas. The pink one on the left was one I made several years ago, using a metal dollhouse figurine covered in cheap lace, painted, then "glazed" with clear nail polish. I was pretty disappointed in the way it came out, so I never shared it. The one on the right I made tonight, and am much happier with it. I used a better quality metal charm for the figurine and raided mom's doll-making supplies for delicate lace in order to make the skirt. I used a gold paint pen to add details around the base, and glued tiny pink roses to her skirt and base. The final step was to glaze her with gloss acrylic.
Now that I have a working camera again, I have quite a few "backlogged" projects to share over the next few weeks, including a new 1/144th scale house. Stay tuned!