Showing posts with label before and after. Show all posts

Saturday, July 12, 2014

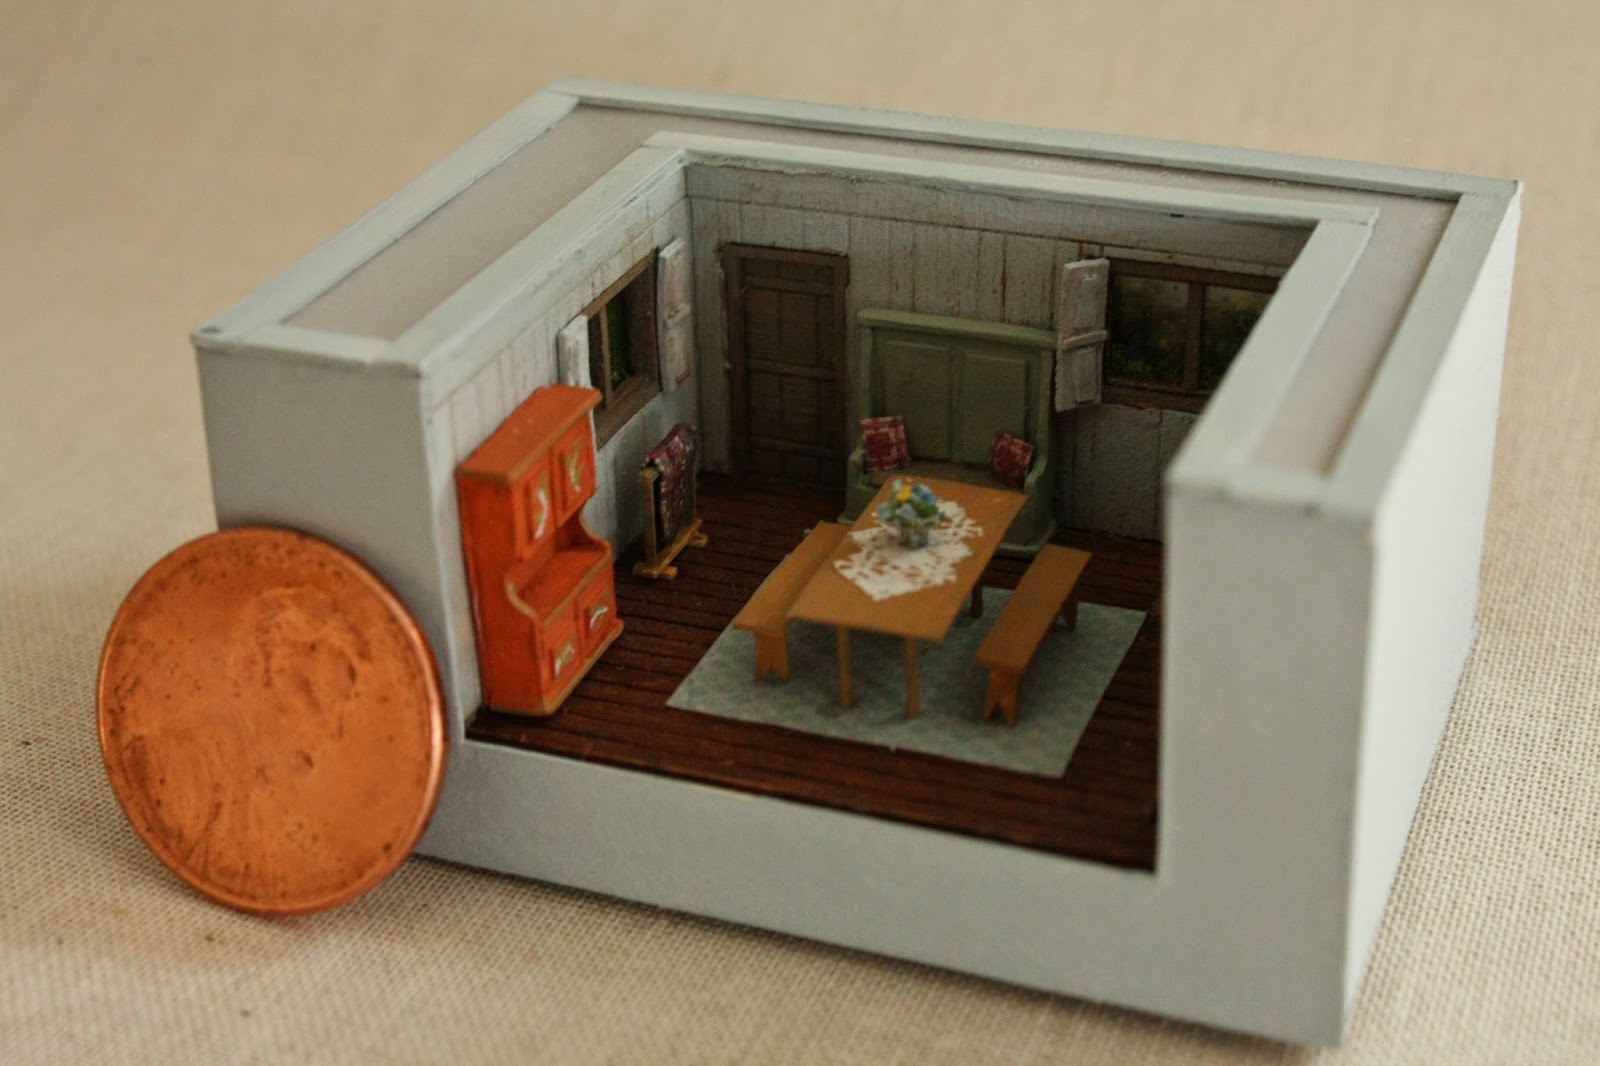
A New Roombox... in 1/144th Scale!

 About five years ago, I came across these fantastic 1/144th scale kits from Davis Wooten.  They produced only two of these room box kits - the Pilgrim Kitchen (shown in this post), and a more formal paneled room called the Salem Dining room. I loved these kits so much that I bought several of each design. Unfortunately, I had a bit of warping trouble with the first one I attempted to put together, which put me off from working on the kits. While straightening up the other day, I found the kits again. 
 This is  the room box that had the warping issues. I now stick the pieces flat to my worktable with extra strong double sided tape, and weight them down as the paint dries.  I think these room boxes are some of the best laser cut kits I've seen. The design of the kit is a bit unusual: the walls and floors are made of two thinner pieces  of wood which need to be glued together, so that the wood grain is vertical inside the box and horizontal outside. In addition to making the box stronger, the double-wall construction creates realistic depth for the window and door recesses, and makes it really easy to paint! The only issue I had was with the fireplace, which showed a few gaps no matter what I did.  Every other piece fit like a glove.
This second time around, I decided to paint the walls a soft grey-blue. I furnished the room box from a combination of sources. The brick red cupboard and green settle were both cast resin pieces from Nell Corkin, and the benches are similar to one she had us build at the Guild School. The basket of firewood and ax were both model railroad pieces. I built the table, quilt stand (under the left window), and shutters from scratch.

Light was a major consideration for this roombox. The kit comes with a beamed ceiling, which looked great but made the room very difficult to see.   I considered using the ceiling, and adding lights to the fireplace and "outdoors" to brighten the room. I thought about adding the beams without the ceiling, or replacing the solid white ceiling with a piece of clear glass. In the end I decided that the beams just weren't going to work for this room box.
I also decided to set the kitchen room box in a larger case, so that I could have a view out the windows. I used a bit of vellum paper for the top of the box.  The frosted finish hides the "outdoors" but lets plenty of light in. 


I added lots of little details to this room. The windows have real glass, courtesy of a microscope cover slip. I even added a few painted flourishes to the red cupboard. I'm particularly pleased at how realistic the  bowl of "wildflowers" look. I  used floral foam for those, broken into tiny, tiny pieces. The finished arrangement is only 1/32" tall. 
I still have a few finishing details to fiddle with, but the room is nearly done. I'm already eyeing the other kits, so stay tuned!

Thursday, June 27, 2013

A Small Before and After

Last night I did a quick makeover.
I've had this little bent baby spoon in my nursery forever. I don't even remember purchasing it! It's not an expensive one. It's made of cast metal, and not particularly well done either. If it were on it's own that wouldn't be a problem, but  I have it sitting next to a delicate sterling porringer and cup from Peter Aquisto. The craftsmanship of the sterling pieces just highlighted the chunkiness of the spoon. It's always bothered me that it
 I used a small set of metal files to reshape the spoon. The bowl of the spoon is quite shallow, and I didn't have any tools to deepen it.  However, I was able to reshape the outside of the bowl, so that the edges are thinner, giving the illusion of a deeper bowl. The biggest difference came from getting rid of the excess metal on the handle. The files left some scratches and rough surfaces, which I scrubbed off with steel wool.
Last of all, I buffed the spoon with a silver-polishing cloth, which brought up a bit more shine than the photo shows. The cheap metal is still a slightly different tone than the silver pieces, but at least it won't look as out of place. I have a few more little updates in mind for the nursery, so I'll take prettier photos once I've made a bit more progress!

Friday, April 19, 2013

Lottie's Bedroom Makeover

Lottie's bedroom is one of the rooms I've always struggled with. Since I love miniature dolls, tea sets, paper dolls, etc, I'm constantly having to edit this room. The other problem was that the furniture nearly hid some of my favorite miniatures. Last year, I did some re-arranging and added the carpet which definitely helped, but there were still a lot of awkward areas. This time, I ended up taking out the Bespaq desk, and moved around every piece of furniture except the bed. I think it's the first time those hats have been visible since I put them up seven years ago!
This little chest used to be wedged in the back corner of the room. I like it much better out in front, especially since it allows my silver chocolate pot and Lucy Coles wash set to be seen. It also reminded me that the chocolate pot is on a truly awful metal tray. I don't object to fake silver, but I can't forgive how chunky that tray is! The Monet and Renoir paintings were half scale  paintings done by Josephine Meyer. The two porcelain dolls were made by Lucy Coles.
With the chest in such a visible spot now, I've started wondering what can be done about its finish. I have a love/hate relationship with Bespaq. I bought/was given quite a bit of Bespaq when I first started collecting. When I started collecting artisan made furniture, I noticed that the Bespaq finishes all started to look flat and a bit plastic next to the beautifully polished woodgrains of the hand made pieces.  I'm toying with the idea of painting or faux finishing this chest, since I do really like the scale of it..
The painted doll bed was one of the first "good" miniatures I bought, over a decade ago. It is still one of the most delicately painted pieces in my collection. Considering the way the paper backing on the mattress has yellowed, and that the dealer who sold it to me specialized in estate miniatures, I'm guessing it's a bit older than that.  The signature on the bottom says  S. Hoeltge(?). Does anyone know who that might be?

Monday, April 15, 2013

The Great Switch

Last night Mom was going through her dollhouse, and decided to rearrange some of the furniture. She ended up taking out a few gorgeous pieces that just weren't working in her house. Rather than packing them away, she let me take them for my house.
This plate was one of the things that came out of Mom's cottage. I only had space for one plate left on my kitchen plate rail. Now that it's full, I'll have to go through and rearrange the order a little. I just worked my way around the room as I bought more plates, so some of my favorites ended up in the very back where they can hardly be seen.
The other thing I took was a gate leg table made by Gerald Crawford. Mom had two of these, and kept the one by the fireplace upstairs, but this one was fair game. I rearranged the parlor a little to make room. In the process,  I decided to  take out a few pieces as well.
This big round Escutcheon* table in the photo above has never fit in my parlor. It was an expensive mistake (and a beautiful table), so I kept moving it around trying to make it work, but it never did.  Mom took one look at it and said it would be perfect for a newly-cleared spot in her house, so I was thrilled that it finally found a home! The orange tree and screen also came out. The orange tree was an early project which needs touching up, but I have a few new spots in mind for it after the makeover.
 
* I'm sure I've seen their website, but I couldn't find it. Does anyone know the link?


Wednesday, April 3, 2013

A Toy Baby Carriage Before and After

Mom has been wanting a baby carriage for one of her little girl dolls to play with. But after looking around online, we couldn't find anything that was both in her budget and sweet. So when we found a commercial metal carriage at the local dollhouse shop, I volunteered to make it over for her.

The carriages started off looking like this. All metal, and painted bright pink. I didn't like the way the hood came so far forward, so I bent the top section back and forth until it broke off. Then I painted out the the carriage, using green, black and gold paint. Those two steps helped a lot, but the metal hood still needed work. Mom had piece of  green leather in her supplies that was perfect for covering the hood. It photographed black, but it's a close match to the green body of the carriage in real life. I also raided her supplies for trim. The inside is padded with upholstered cotton panels.

I still need to finish the wheels. Right now they're just painted silver, but I'd like to add more of a tire. I have a very vague memory of a tricycle makeover I saw somewhere online. I seem to remember that they used the rubber casing from electrical wire to wrap the wheels, but I can't find that tutorial anywhere. Has anyone done this/ know where that tutorial might be? All my experiments so far have failed.

Wednesday, March 13, 2013

Two New Additions to an Old Project


A long time ago, I posted this blue and cream vanity I'd painted and accessorized. There was only one problem. I didn't have a matching seat. After quite a bit of looking, I settled on this little bench, and painted it to match. I chose a brighter blue silk to upholster the bench cushion, since I knew I'd be covering a lot of it up with a sheer white shawl, and possibly a hat. I have a pretty embroidered handkerchief I've been saving for use as the shawl.
I also raided Mom's dollmaking supplies to make the parasol. This is one of those random items that I'd avoided making in the past, thinking it would be too complex. But since it didn't need to open, the parasol was actually super easy, and I can see how I could easily addapt it for a lot of different looks.  I used white batiste with a tiny woven dot design. I dunked the fabric in tea to tone down the bright white, and used some of my tiniest beads for the handle. When I couldn't find the right shade of ribbon in Mom's supplies, I painted the blue edging on. I

Wednesday, December 19, 2012

A Holiday Tradition, and a Before and After

I've decided I'm keeping the smaller tree in the parlor this year, and the larger one will stay in storage.With that choice made, I really need to find/make a few more gifts for under the tree.
To fill some of the space around the tree, I started  pulling a few toys from around the dollhouse. This little cart is great for holding some of my favorite dolls from Lucy Coles. I have an unconscionable number of these little dolls- and I love every single one! My mother gave me a miniature doll as my Christmas gift every year for most of my childhood. Every year I'd have to hunt all over the (big) tree for the tiny little  hidden somewhere in its branches. The doll
The cart is a plastic toy which I repainted. Here's the before picture of the cart. It wasn't bad, actually, pretty good from a distance. I liked how delicate it was, but the sheen of the plastic bothered me.

Here's a better view of the cart after. I primed the piece with grey, and dry brushed over the top to look like flaking white paint over weathered wood.  I used metallic silver and rust highlights on the wheels. I think the handle still needs a sprig of greenery, and a big bow.

Friday, November 16, 2012

New Again

It's been an embarrassingly long time since I did a thorough clean of my dollhouse. I've done a bit of spot cleaning on the most delicate pieces- I've kept the silver semi-polished, oiled a few of the artisan pieces, but overall it was looking really dusty. The floors were the worst- they looked like they hadn't been cleaned in a hundred years...
But not any more! I finished up yesterday, and it's amazing what a difference it made. I want to rearrange a few of the rooms, but just getting the dust out, the wood oiled, and the silver shining made an enormous difference. 


Wednesday, September 19, 2012

Hundreds of Tiles Later...


Last time I promised to show my dairy project when I finished the tiling the walls. Well, it only took me about two weeks and 650 tiles!  Let's just say that I won't be using tiles again anytime soon.The tiles I chose aren't really appropriate for a dairy (they are much too elaborate) but I figured that for all the work of the room, I might as well use tiles I really liked.
There's still a lot to be done in the room, but the basic shell is finished. 
Please forgive me if this post is a little picture heavy. I'm so happy to be done with the tiles! I made so many tiles I thought for sure there would be extras, but I only had four border tiles left over at the end.

The stone floor is made of paper clay. It's looking a little too brown with all the blue and white. I may repaint it a little more grey.
I was very worried about keeping the tiles straight, so I tiled the walls first,and added the floor after. I made the mistake of gluing the door in first, and it ended up a little too far to the left, which made problems with the fit of the tiles. You can see that I had to add a tiny strip of partial tiles to the right hand corner to fill in the gap!
I'm still working on the door. I just repainted it slightly creamier white, and still need to add some subtle aging. I also need to add some sort of door latch or knob. The hinges I made out of thick paper. I was going to paint them to look like iron, but once I got the stone floor in I thought black hinges would look too dark in the room.
I also used my brother's pocket knife (don't tell him!) to widen the cracks between the boards. The "moulding" I used to make the door casing is just two pieces of layered cardboard.

The gallery room box I took apart to house my dairy had a really terrible gold frame. It was painted three different shades of gold, some matte and some shiny. But the paint job was hiding a decently shaped frame. So I taped off the inner most bands of beading, protected the inside of the box with a  piece of cardboard, and sprayed the frame mat black. I couldn't believe the difference it made!
Before...
After!

Sunday, March 18, 2012

Another Before and After

In the last post, I showed a sofa and a chair I'd reupholtered. Today I wanted to share the small change I made to the bureau in Pheboe's bedroom. I found this dresser on Ebay several years ago. It's a little chunky, but it doesn't read that way in the room. I also really liked the finish. The only bad thing about it was that it had huge wooden knobs on the larger drawers.

I replaced the knobs with smaller glass beads. I think it makes the piece look much better!

Tuesday, March 13, 2012

Two Before and After Projects

It's been a while since my last post! I got my laptop back a few days ago, and have been slowly catching up with everything I've missed over the last few weeks.
I thought I'd share two upholtery projects I did recently. The first is the desk chair in the parlor. It's a bespaq chair that was upholstered in a thick green and cream woven fabric. I actually quite liked the fabric of the chair, but it always seemed a bit pale for the room. You can see that fabric and chair below.


Last summer, a local decorating store gave me several old fabric sample books. I found a brown silk in one of them which I used for the chair. There was barely enough fabric to cover it, but I managed!

The second piece was this sofa from the master bedroom. I bought it years ago thinking I'd recover it. I had several problems with the original upholstery: I wasn't fond of the contrast between the dark wood and the light fabric, the white was a bit shopworn, and there was actually a jacquard pattern woven into the fabric which was subtle but very out of scale. It was in the parlor (which is directly below), but it always seemed a bit big in there. As soon as I moved it upstairs, I knew the fabric I wanted to use.


This is one of my favorite fabrics. Though the fabric looks like a pink and cream stripe from a distance, there are also narrow dark brown and pale orange stripes beside the pink stripes which make things a bit more interesting.
By the way, this one isn't quite finished. Only two of the outer side panels are glued in. I still need to cover the one for the back. It will also need to be trimmed with fine cording to hide the bottom edge of the seat cushion. Have you noticed my big mistake yet? I got the orientation of the fabric mixed up at one point. On the seat and right side, the brown stripe is to the right of the pink stripe. On the other two, the brown is to the left! It's been driving me crazy ever since I first noticed!