Showing posts with label room box. Show all posts

Tuesday, September 16, 2014

Lots of Catching Up

A lot has happened in the last two months, and this blog post is long overdue.  The most exciting thing to happen on the miniatures front was this:
Anne Smith's article about Mom and I appeared in the September issue of Miniature Collector!  We met Anne at the Philadelphia show last November. She tracked us down after the show and proposed the article.
The title of the article, "Two is Company and More," is a play on our business name, Two's Company Miniatures.  


The other big event was Mom's graduation. For the past three summers, she's been in an intense master's program to become a principal/school administrator.  This was my graduation gift to her. 
I used a man's slipper pattern kit (designed by Bobbie Schoonmaker) to get the basic slipper shape. Since Mom already had a finished pair of the kit slippers, she asked me to make a pair with foxes instead.  I charted the fox heads, then added hounds to the side.  Since I had Mom approve the design and colors, the slippers weren't really a surprise, but I did manage to surprise her that they were finished!

Last of all, I've started a new project. It's an offshoot of my little french shop project.  I'm trying to create a very different feel despite using similar techniques.

I'll post more about this project next time: this is just a sneak peek!

Saturday, July 12, 2014

A New Roombox... in 1/144th Scale!

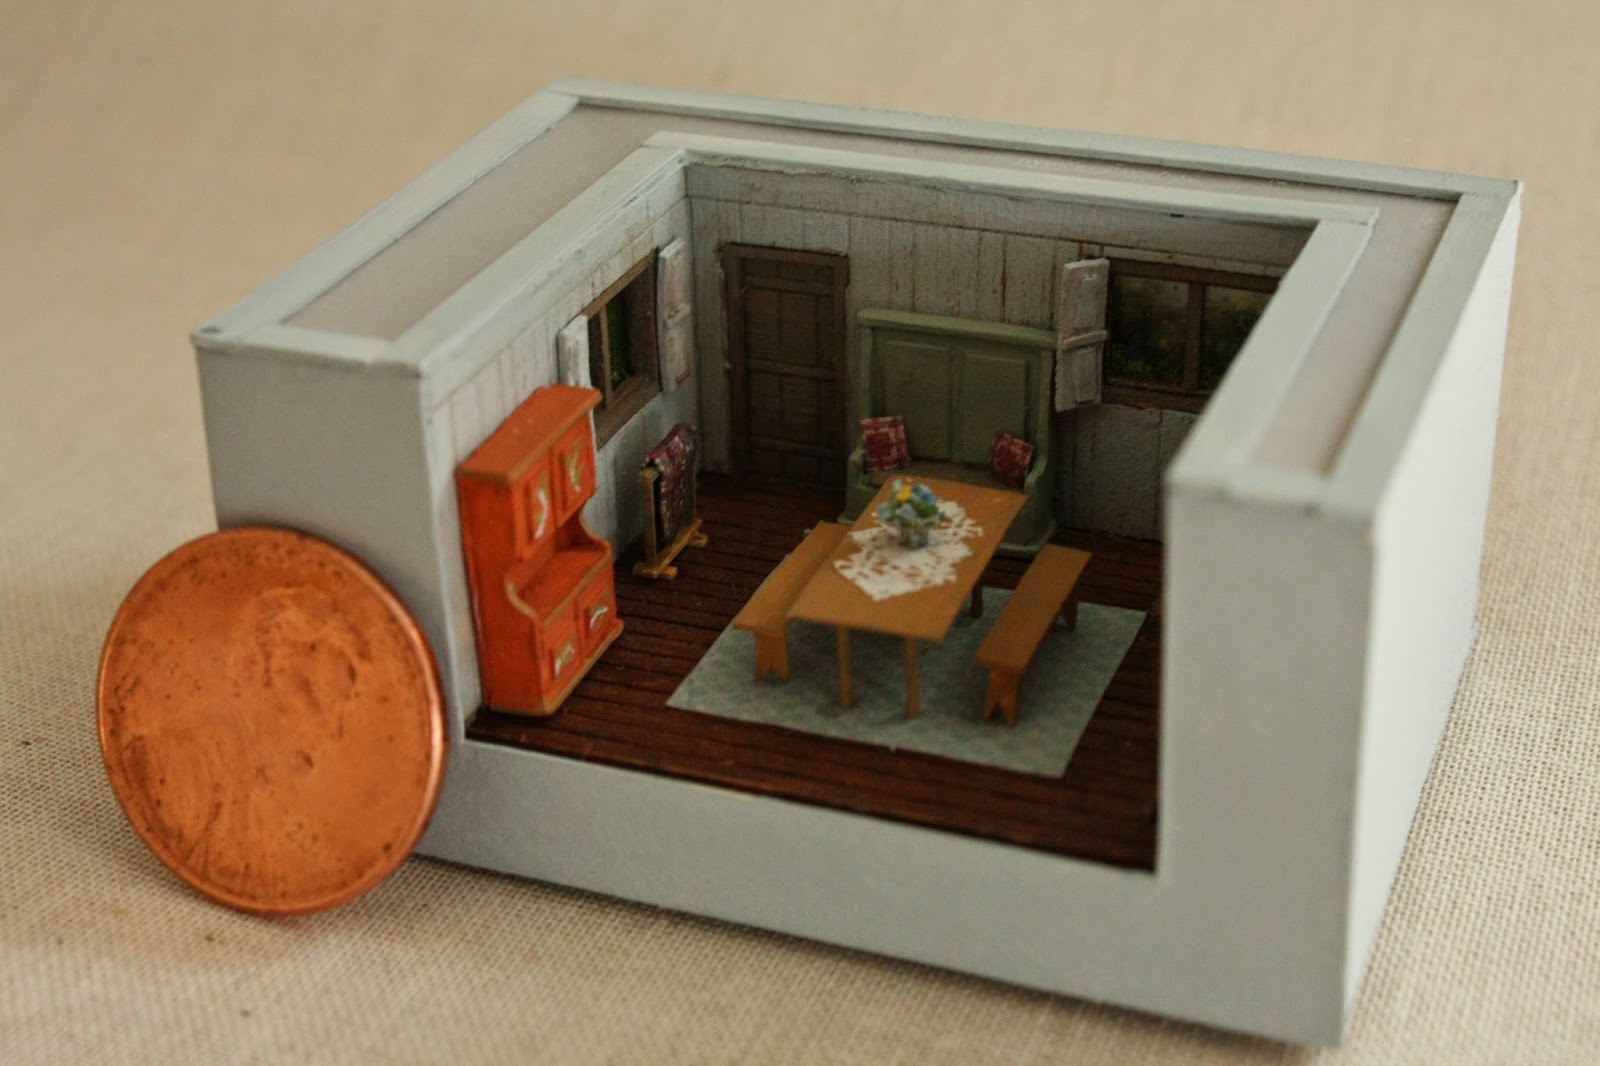
 About five years ago, I came across these fantastic 1/144th scale kits from Davis Wooten.  They produced only two of these room box kits - the Pilgrim Kitchen (shown in this post), and a more formal paneled room called the Salem Dining room. I loved these kits so much that I bought several of each design. Unfortunately, I had a bit of warping trouble with the first one I attempted to put together, which put me off from working on the kits. While straightening up the other day, I found the kits again. 
 This is  the room box that had the warping issues. I now stick the pieces flat to my worktable with extra strong double sided tape, and weight them down as the paint dries.  I think these room boxes are some of the best laser cut kits I've seen. The design of the kit is a bit unusual: the walls and floors are made of two thinner pieces  of wood which need to be glued together, so that the wood grain is vertical inside the box and horizontal outside. In addition to making the box stronger, the double-wall construction creates realistic depth for the window and door recesses, and makes it really easy to paint! The only issue I had was with the fireplace, which showed a few gaps no matter what I did.  Every other piece fit like a glove.
This second time around, I decided to paint the walls a soft grey-blue. I furnished the room box from a combination of sources. The brick red cupboard and green settle were both cast resin pieces from Nell Corkin, and the benches are similar to one she had us build at the Guild School. The basket of firewood and ax were both model railroad pieces. I built the table, quilt stand (under the left window), and shutters from scratch.

Light was a major consideration for this roombox. The kit comes with a beamed ceiling, which looked great but made the room very difficult to see.   I considered using the ceiling, and adding lights to the fireplace and "outdoors" to brighten the room. I thought about adding the beams without the ceiling, or replacing the solid white ceiling with a piece of clear glass. In the end I decided that the beams just weren't going to work for this room box.
I also decided to set the kitchen room box in a larger case, so that I could have a view out the windows. I used a bit of vellum paper for the top of the box.  The frosted finish hides the "outdoors" but lets plenty of light in. 


I added lots of little details to this room. The windows have real glass, courtesy of a microscope cover slip. I even added a few painted flourishes to the red cupboard. I'm particularly pleased at how realistic the  bowl of "wildflowers" look. I  used floral foam for those, broken into tiny, tiny pieces. The finished arrangement is only 1/32" tall. 
I still have a few finishing details to fiddle with, but the room is nearly done. I'm already eyeing the other kits, so stay tuned!

Tuesday, May 21, 2013

Open books in Miniature Rooms

 
Remember these open books that I shared several months ago? I just got an exciting email the other day, from Robert Off of Miniature Rooms Company. We met last November at the Philadelphia Show, when our tables were situated across the aisle from each other.
(photo courtesy Miniature Rooms Company)
Bob builds and decorates gorgeous miniature room boxes, so I was very flattered when he purchased a few little things from my table. The other day, he emailed me some photos of his latest room boxes, and pointed out that my open books were in both!
(photo courtesy Miniature Rooms Company)
Here's a close up of the built-in cabinet in "The Captain's Table" where my book is displayed. I'm dying to get a closer peek at that dining room set as well! This is actually the second incarnation of this room box. The first room box, which had a similar layout but was decorated differently, had to be rebuilt after some significant water damage!
(photo courtesy Miniature Rooms Company)
This "Lighthouse Keeper's Office" is the second room where Bob used one of my books, on the desk. I love the tranquility  of this room, and the playfulness of the dogs!
The rest of Bob's work can be seen on the Miniature Rooms website.

Friday, May 3, 2013

A Romantic Corner

With the Sturbridge Show just a month away, I've been thinking a lot about how to display certain things. While picking up a few things we genuinely needed for the show, I saw a little cardboard box that was the perfect size for displaying a few small miniatures, and had to buy it as well. 
 
I used a sheet of wallpaper that I bought ages ago to paper the inside of the box. The paper is Society Garden from MiniGraphics.
I'd bought the paper because I thought the design was too pretty to pass up, but I never liked how bright the colors were. I gave the wallpaper a wash of coffee to tone it down. You can see wheat a difference it made! The floor is just a piece of full-scale wallpaper that was printed to look like chipping paint.
Once the box was papered, I had to play a bit. I pulled out a lot of different miniatures, but this was the combination that I liked best. The original post on the love letters can be found here. I thought I'd written about the watercolor and table (both of which I painted) but it doesn't seem so. 
This grouping was just for fun, since we're planning to fill the box with completely different items for the show. But I loved having the excuse to pull out old projects and try them in new combinations. I'll post more on the box itself another time!

Monday, February 11, 2013

A New 1/144th Scale Project


I haven't posted any new projects in a while, because I've been working on a special little project.This roombox started out as a piece of bespaq furniture. I made the wallpaper pattern out of a few clip art designs, which I shrank and repeated. I built two quick little console tables out of little brackets for either side of the fireplace. As it turned out, the one on the right can barely be seen.  I took the crooked andirons out and fixed them right after taking this photo.
 
See? No more crooked andirons! I mostly furnished the box with resin pieces from Nell Corkin. The fireplace,sofa, wing chair, and dresser were all from Nell. 
I added a plastic model railroad cake and teacup to the table.
The flowers in the blue pot were a last minute addition. I used a vintage seed bead, which is closer to the blue of the furniture in real life. I still need to finish up a few little details. I'm debating whether I should add a pair of candles/ginger jars to the mantel, or just leave it plain. I also need to line the drawer below the room with some pretty paper, but other than that, this project is done!

Friday, February 1, 2013

A Small Scene

This gold room box is started out as another commercially produced room boxes, like the one I turned into a dairy. Mom made two of these room boxes a number of years ago. She sold one, and I kept the other.

All the wood in this box was aged using watered down acrylic paints. The plaster walls are just white paint, thickened with a little baby powder.
The stone floor and steps was made from tan polymer clay, since we couldn't find paper clay. The clay was textured with wadded up tin-foil.

I keep this room box above my workspace. I've never decided on a permanent display. For a long time, it just held a random assortment of miniatures that I didn't want to get dusty. That seems to be a common theme of my room boxes, unfortunately! Now that I've cleared it off all the junk, I'd like to add a few details to finish out the scene. It won't take many accessories, but finding just the right ones may be a challenge!
I'm on the fence about the gold frame. I don't hate the gold, but I think painting it black (the way I did with the dairy) may make the whole thing that much better. Would you paint the frame or leave it gold?

Wednesday, September 19, 2012

Hundreds of Tiles Later...


Last time I promised to show my dairy project when I finished the tiling the walls. Well, it only took me about two weeks and 650 tiles!  Let's just say that I won't be using tiles again anytime soon.The tiles I chose aren't really appropriate for a dairy (they are much too elaborate) but I figured that for all the work of the room, I might as well use tiles I really liked.
There's still a lot to be done in the room, but the basic shell is finished. 
Please forgive me if this post is a little picture heavy. I'm so happy to be done with the tiles! I made so many tiles I thought for sure there would be extras, but I only had four border tiles left over at the end.

The stone floor is made of paper clay. It's looking a little too brown with all the blue and white. I may repaint it a little more grey.
I was very worried about keeping the tiles straight, so I tiled the walls first,and added the floor after. I made the mistake of gluing the door in first, and it ended up a little too far to the left, which made problems with the fit of the tiles. You can see that I had to add a tiny strip of partial tiles to the right hand corner to fill in the gap!
I'm still working on the door. I just repainted it slightly creamier white, and still need to add some subtle aging. I also need to add some sort of door latch or knob. The hinges I made out of thick paper. I was going to paint them to look like iron, but once I got the stone floor in I thought black hinges would look too dark in the room.
I also used my brother's pocket knife (don't tell him!) to widen the cracks between the boards. The "moulding" I used to make the door casing is just two pieces of layered cardboard.

The gallery room box I took apart to house my dairy had a really terrible gold frame. It was painted three different shades of gold, some matte and some shiny. But the paint job was hiding a decently shaped frame. So I taped off the inner most bands of beading, protected the inside of the box with a  piece of cardboard, and sprayed the frame mat black. I couldn't believe the difference it made!
Before...
After!

Sunday, September 9, 2012

Feeling Blue (and White)

 I've been working on another project for the last week or so. For a while, I've been unhappy with the look of my gallery roombox, which sits on my worktop. I really threw the box together, and some of the shortcuts I took looked really bad. It was also in constant disarray. Usually, it had more paintings waiting to be hung than actually on the walls. It was definitely time for a change.

Since the gallery roombox idea hadn't worked out, I decided to try something completely different in the same box. I decided to make it into an old-fashioned dairy,with tiled walls and stone floors, such as you might find on an old English estate! I'm taking a few liberties with the design, but hopefully it will capture the feel. 

I'm not going to show the room yet. Suffice it to say that I have a long way to go. I'm still working on tiling the walls, and I'm undecided about the best way to get the look I want for the floor. In the mean time, I thought I'd show how I'm making the tiles...
First, I found images of old tiles I liked online.I re-sized them to be 1/2" square (the border tiles are 1/4" by 1/2") and fiddled with the colors until the tiles were approximately the same shades of blue and white. After that, I printed the tiles on watercolour paper. This particular pad of paper had a little too much tooth for my miniature paintings, but the heavy texture creates a realistic ripple effect in the tiles.

Next, I needed to create an easy system for "glazing" my tiles. I glued plastic 'pony' beads to a sturdy old piece of cardboard. I spaced the beads approximately 1" apart. Once the glue had dried, I placed tiny pieces of poster putty (aka blu-tack) on each bead. You can see the green putty on the bead in the background.
After that, it was a simple matter to cut the tiles apart one by one and stick them on beads. I used a drop of gloss medium to 'glaze' each tile, and let them dry for a few hours.When they were dry, I glued the tiles to another sheet of watercolour paper, using a square to keep the rows relatively straight.