Friday, July 13, 2012

A Tisket, a Tasket, a Cook with a Basket

Today I wanted to share this cook Mom sold at the last Sturbridge Festival. The fun thing about the customer who bought her was that she was there with her daughter also a miniature enthusiast. Then, another mother and daughter pair came up to our table, so we were three sets of mothers and daughters!
One of Mom's favorite parts of making the dolls is finding the right props! When she saw this vegetable basket in Eileen Godfrey's shop, it seemed perfect. Though mom positioned her arms to hold the basket, I couldn't find the wax in time for the photograph.

She even has a tiny brooch at her throat, though it's quite plain- she's a cook, after all!


Wednesday, July 11, 2012

Finishing Up

I'm trying to get through some of the unfinished projects that have been lingering around the dollhouse for months, if not years. One of those projects is the carpet in Phoebe's room. The carpet is a punch needle kit from Joan Grimord, which I completed two years ago. The punch needle technique went quite quickly (as I recall, it took about a week of intermittent work), but the easiest step took the longest.

  
This is the way the carpet looked the last time I showed it. All I had left to do was finish the edges. Would you believe that it took me two years to do that?

Here's the rug now. I'm quite happy with the way that it turned out. I was terrified of the finished rug looking thick and bulky, but it's actually quite flat. I've moved it next to the bed since this photo was taken. It still feels a little bright to me (the shop where I bought the threads had an extremely limited color selection, and I've found much better sources since.) I may try giving it a light dye job just to tone the colors a little, but I'm not sure. In any case, this is one more small project crossed off the list!
P.S. I just noticed that the picture of the unfinished rug also shows the dresser handles I replaced. I still can't believe what a difference that little change made!

Tuesday, July 10, 2012

Singin' in the Rain

One of the things I'm searching for is a really beautiful umbrella stand for the front hall. I had a commercial brass stand in there for a while, just to corral the various umbrellas and walking sticks I've acquired over the years. But I took that piece out the last time I rearranged the house, and it bothered me how messy that corner looked with canes just propped against the wall waiting for a holder. So I tried making my own.
 In this photo of the back, you can see how I pieced the two findings together. The little green lines are snippets of wire to strengthen the every spot where the two findings connect.  I made the base from stacked cardboard, and a soft metal wedding ring from the dollar store for the rim.  The top loop is made from a second ring. I used super glue to hold everything together, and painted it all to look like tarnished brass.
It's a little short, but not too bad considering it was made out of just what I had on hand. I'm still planning to look for one that wasn't put together with superglue, but this will work until I find the perfect umbrella stand!

Sunday, July 8, 2012

A Micro House, Part 2

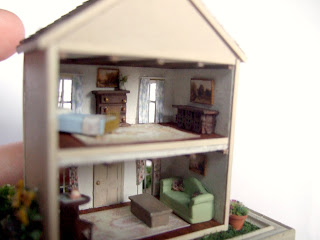
The other day I showed you the tiny house I've been working on. Here are the photograps of the interior. I'm still having fun with litttle details, but the major pieces are in place. There's a tiny vase of roses on the bureau, and a pink and gold teacup on the table downstairs. The paintings in this house are printouts. I've still got a few micro watercolors left from the bunch I did a few years ago, but they looked a bit bright for this house. 


Downstairs, I used one of Nell Corkin's resin sofas. Nell has sets of this furniture listed for sale on her website.  I bought one of each set at the Guild show, and have been hoarding it all for the past year. Click on the photographs if you'd like to see them larger!

Thursday, July 5, 2012

A Year After the Guild School, or Yet Another Micro House

In my last post, I wrote that I was working on a special project. Well, I'm finally getting to reveal it now! Last year, I was lucky enough to go to the Guild School in Castine, Maine. I took Nell Corkin's 1/144th scale class. We made this tiny garden shed:
The class was really interesting, and I learned a lot. You can read a little more about it here. Or visit Nell's blog, at nell-miniminis.blogspot.com to see her amazing work.
Then, a few months later, I decided to try making another  micro shed on my own. It was a lot more difficult to build without the whole process broken down into nice manageable steps, but I managed. I had a few issues with scale, abandoned the more ambitious parts of the project, and struggled with the roof, but overall I was thrilled that I'd been able to use what I'd learnt in the Guild School to make a second, different structure.
For my newest micro structure, I really wanted to make a two story structure. I'd planned to make a loft in my little green shed, but an mismeasurement meant that I had to either scrap the loft, or re-cut everything.

I was much more careful with the measurements for this house, but I still had a few "oops" moments. Luckily, most of my mistakes this time around were easily fixed!
The ridge cap and finials on the roof were one of the last things I added. I used techniques Nell showed us for the climbing roses. I still need to touch up the landscaping on this side of the house.

On the other side, I added some sunflowers made from an SDK kit. I bought a few of their 1/144th scale plant kits several years ago, but this was the first I put one together. They went together really easily, and the scale looks about right, which is not always the case with plants advertised as 1/144th scale.
I'll post part II, the interior, sometime this weekend!

Friday, June 22, 2012

Wash Day

I'm working on a small project that I can't wait to share. Unfortunately, I'm mostly working on it late at night, so I can't get good photographs. In the mean time, I thought I'd share another of the dolls Mom said goodbye to at Sturbridge.

When we first started talking about doing a show, one of the big questions was how to best display the dolls. Mom loves to use accessories to tell a story, so we wanted to be able to suggest the possible setting in a very simple way. We found plain black frames that made a nice display base, and made a variety of floors which we could swap in and out as necessary. For this one, we dry brushed grey paint over an unfinished floor. Simple but effective.


Mom purposely chose a rather robust woman for this doll. Washing is hard work!

 Mom bought the wringer and tub unfinished, and I aged them for her. Mom did all the resin pouring. I believe the cat with kittens is from Falcon miniatures.

Tuesday, June 19, 2012

Have you entered Lucy Coles' Giveaway?

Do you have an artisan whose work you just love? Every time you go to a show, you come back with another piece, until one day you realize that almost every room in your house has something from them...
For many years that artisan, for me, was Lucy Coles, specializing in miniature needlework and porcelain. Unfortunately for me, Lucy dropped out of the miniature world for several years. But now she's back! She has a new blog, called Evalina Rose, to share her half-scale cottage project, and has the most FANTASTIC giveaway going at the moment (more on that at the end of this post).
In the mean time, I thought I'd highlight how many of my favorite toys and porcelain pieces came from her!

 I bought this porcelain vase from a dealer shortly after Lucy Coles stopped doing the local shows. It has been in the dining room for years, but I just found a better way to display it in the music room.
 A few of the plates in the kitchen, like this pink one, were painted by her. Apologies for the terrible pictures, my camera was acting up when I took these!


The green plate second from left was also painted by her.
 The pale blue and white wash pitcher in Lottie's room was an impulse buy that I never regretted...
 and it came with a matching chamber pot!
 Every time I see this little baby boy doll, I want to pick him up and cuddle him. His red and white suit has the tiniest knitting!

For several years, it was a Christmas tradition for Mom to give me a Lucy Coles doll. Sometimes it would be a doll I had seen at a show, other times a complete surprise. I named almost all of them...
 
 This is Georgiana, with real leather boots, and an entirely knit outfit. She's only about 2 1/2 inches tall! She was one of the last dolls Lucy Coles made for me. I was reading Pride and Prejudice at the time, and a bit obsessed with the name Georgiana.
 Here's Annabelle and Clara. Annabelle is super tiny, only about 1/2", but her arms are jointed. Annabelle's name came from the book The Doll People by Ann Martin and Laura Godwin. Clara's name came from the Nutcracker, which my grandparents took me to see one Christmas when I was very young.

 This is Meg. I love her lace shawl,  and her face is especially sweet. Her name came from Little Women of course!
For the life of me, I can't remember what I named this doll! I always loved how delicate she looked with the lace petticoat showing through her dress!

Here's another doll whose name I can't recall. Can you see her tiny painted gold necklace? Many of the dolls also have painted barrettes as well.
 Here's Sylvia and Hitty. Hitty was the very first Lucy Coles doll I fell in love with. The name  Sylvia came from one of my favorite childhood books, The Wolves of Willoughby Chase by Joan Aiken. The name Hitty came from the book Hitty: Her First Hundred Years, by Rachel Field. 
Last of all is my little bear in the attic. 

Now comes the really fun part. If you want your very own Lucy Coles creation, sign up NOW for her giveaway! She's giving away this darling mouse named Bella:
(photograph from Lucy Coles)
The giveaway ends tomorrow, so  hurry!